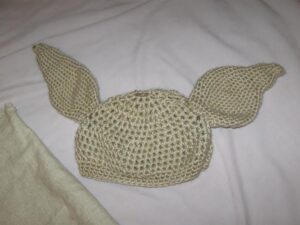
Potter DIY: House-Elf Halloween Costume
This easy crochet DIY will make the perfect Halloween Harry Potter costume for your child. This three-piece project is simple straight-stitch sewing that can be done on a larger scale for older children and adults. This submission comes from Katie, a stay-at-home mom and Harry Potter fanatic. This past Halloween, her family dressed up in complete Potter garb, which is how the baby house-elf costume idea was born.
This adorable little costume will require a small amount of crochet knowledge. For instructions on how to crochet, just Google. (Hint: Ch = chain, Sc = single crochet, and Dc = double crochet, which are types of crochet patterns.)
What You’ll Need:
- 4mm crochet hook
- Tan (skin tone to match wearer) DK 8-ply yarn
- Yarn needle
- Tea cozy/pillowcase
Directions:
Step 1: For the hat, start with a magic circle (Ch 2 counts as the first Dc in each round).
- Round 1: Ch 2, 11 Dc in circle (12 Dc)
- Round 2: Ch 2, 2 Dc in each st around (24 Dc)
- Round 3: Ch 2, Dc in same st as Ch 2, *Dc in next st, 2 Dc in next stitches* around (36 Dc)
- Round 4: Ch 2, Dc in same st as Ch 2, Dc in next 2 stitches, *2 Dc in next stitch, Dc in next 2 st* around (48 Dc)
- Round 5: Ch 2, Dc in the same stitch as Dc, Dc in next 3, *2 Dc in next stitch, Dc in next 3 stitches* around (60 Dc); this is your increase circle, which should measure 5 1/2 inches for the size we are making
- Rounds 6–12: Dc around (60 stitches)
- Rounds 13–16: Ch 1, sc in the same stitch as Ch 1 and around (60 sc)
Step 2: For the ears (make 2), start with a magic circle and work in continuous rounds.
- Round 1: 6 Sc into the circle (6 Sc)
- Round 2: Sc around (6 Sc)
- Round 3: 2 Sc in next stitch, Sc in next (9 Sc)
- Round 4: Sc around (9 Sc)
- Round 5: 2 Sc in next st, Sc in next (14 Sc)
- Rounds 6–10: Sc around (14 Sc)
- Round 11: 2 Sc in next st, Sc in next (21 Sc
- Round 12: Sc around (21 Sc)
- Round 13: 2 Sc in next, Sc in next 2 stitches (28)
- Rounds 14–16: Sc around (28)
- Round 17: 2 Sc in next stitch, Sc in next 2 stitches (38)
- Rounds 18–22: Sc around (38)
- Round 23: Sc2tog, 2 Sc (28)
- Round 24: Sc around (28)
- Round 25: Sc2tog, Sc in next 2 stitches (21)
- Rounds 26–27: Sc around (21)
Finish off with a long tail for sewing.
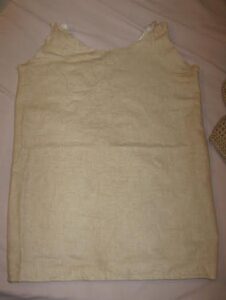
Step 3: For the sheath, you can just use an old pillowcase and cut armholes and a hole for your child’s head to go through. You can also use some super soft flannel fabric that has a slightly weathered weave look to simulate the idea of it being “worn-in.” For the pattern, you can use a sleep sack or anything that fits them loosely. Trace out about an inch from it to allow for seams. Then sew that into a loose sheath and hem the bottom edge to keep it from fraying too much. You can cut the top just like an A-line men’s shirt or tank top. When you pull the sheath over your child’s head, just tie the straps at the top of each shoulder. This way, they aren’t actually wearing clothing, so they look just like a house-elf; this also makes it a bit adjustable.
And that’s it! Your infant is ready to rock the trick-or-treat scene, Potter style.
Check out more DIYs on our Potter DIY page.


